Populate the Quest List
This document needs an UPGRADE
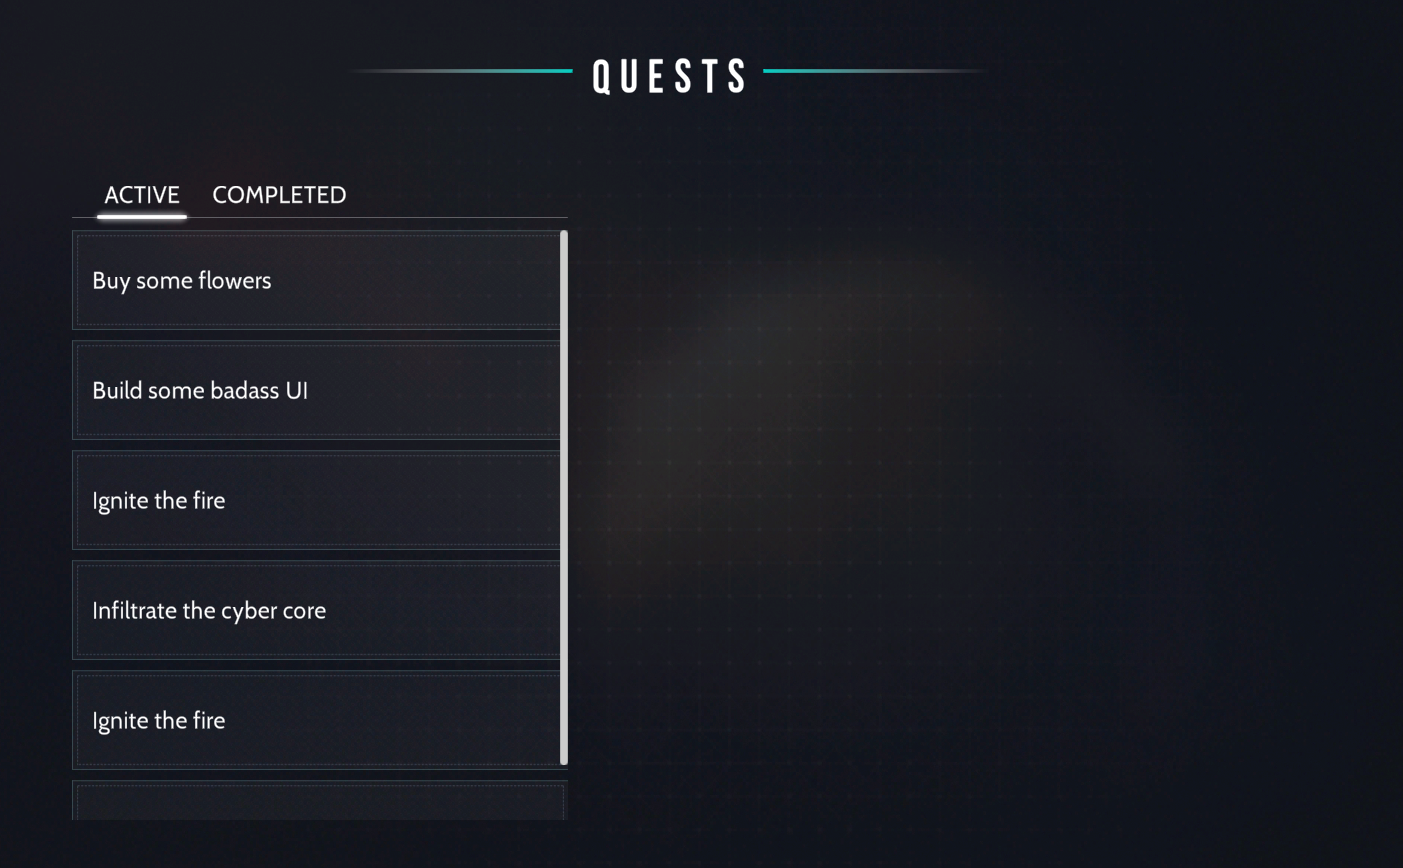
Now that the click events are being registered, it's time to populate the quest list with data and filter it. By the end, your project should look like this:
Bind the data
There is also a small refactor that you'll need to do so that the QuestList has data to display. Open AppRoot.ui and update the following code:
template AppRoot : AppRoot() {
    state Quest[] allQuests = MakeQuests();
    run System.Array.Sort(allQuests);

    state SelectionManager selectionManager = new SelectionManager("selected");

   Div(style = [@header-row]) {
       Div(style = [@gradient-line]);
       Text_H1("Quests");
       Div(style = [@gradient-line]);
   }

   Div(style = [@master-detail-container])
   {
        QuestList(selectionManager, questList = allQuests);
   }
}
Here's what the new code is doing:
SelectionManagerkeeps track of the quest and element that is currently selected to ensure that no two elements both simultaneously have theselectedattribute applied. You can find the class in the Assets/Evolve/Scripts folder.MakeQuests()is a helper method that generates random quest data for demonstration purposes. In reality, you'd want to assign this real data that is likely coming from a scriptable object or database. The results are stored inallQuestsstate variable, which ensures thatMakeQuests()is only run once.- The
runkeyword allows you to execute regular C# code inside of the template. In this case, it's sorting the quests. - The
QuestListtemplate is now passing in the allQuests parameter, which you'll store a reference to and bind to aScrollView.
Open QuestList.ui and update the QuestList element at the top to include a variable that will store the allQuests data and a reference to SelectionManager:
element QuestList {
    implicit SelectionManager selectionManager;
    IList<Quest> questList;
 }

template QuestList : element QuestList {
    //original code
}
Create the ScrollView
Since there is a high likelihood that the player will have more quests than what can show on screen, you'll add them all into a ScrollView that will be styled to fit the look of the game. To do this, you'll need to update QuestList.ui. Add the following code to the end of the template section:
template QuestList : element QuestList {
    //Original code above

    ScrollView(style = [@quest-list]) {
        foreach(quest in questList, keyFn = (item) => item.Id) {
            if(quest.Status == status) {
                QuestLogItem(quest = quest, mouse:click = () {
                    selectionManager.Select($this, quest);
                });
            }
        }
    }
}
Here's what the new code is doing:
ScrollViewis a standard container that is available in the BasicElements module that comes with Evolve. It'll handle generating the ability to scroll for you.- Within
ScrollViewis a loop that will iterate through each item inquestListand create a newQuestLogItem, passing in the quest data and setting amouse:clickevent that points towards theSelectionManagerhelper class that was included in the starter project.
Finally, you'll need to add the new styles into QuestList.style:
const color_ScrollTrack = rgba(75, 75, 75, 255);

style quest-log-scroll-knob {
    PreferredWidth = 6px;
    Feather = 1px;
    AlignmentTargetX = Parent;
    AlignmentOffsetX = -1px;
    CornerRadius = 50%;
    BackgroundImageRotation = 270deg;
    BackgroundImage = linear-gradient("GeneralModule::scrollbar-gradient");
}

style quest-log-scroll-track {
    PreferredWidth = 3px;
    AlignmentTargetX = Parent;
    AlignmentDirectionX = End;
    AlignmentOffsetX = -12px;
    BackgroundColor = @color_ScrollTrack;
}
Create the QuestLogItem
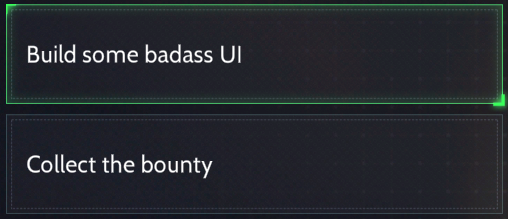
Next, you'll create the QuestLogItem element that will look like this:
Create new UI and Style Files named QuestLogItem. Open QuestLogItem.ui and add the following code:
using QuestLog;

element QuestLogItem {
    Quest quest;
}

container QuestLogBracket();

template QuestLogItem : element QuestLogItem(attr:completed = quest.IsCompleted) {

    Div(style = [@quest-log-shade]);
    Div(style = [@quest-log-item-container]) {

        Text_H2(quest.Title);

        if(quest.IsCompleted) {

            Checkbox(isChecked = true);
        }
    }

    QuestLogBracket();
    QuestLogBracket();

}
QuestLogBracket is a container that will display the two green corner brackets only when the element is selected. Instead of defining the container, you could create a div and manually set the style.
When QuestLogItem is first instantiated, it will look at the value of quest.IsCompleted and set the completed attribute to either true or false. This will then determine if the style should display as though the quest is active or completed. (You will set these styles shortly.) The rest of the code is pretty straight forward - two Div containers are being created and have their styles set. The second Div contains the quest title and will show a checkbox if the quest is completed. Checkbox is a custom container included in the project.
You can also set the attribute in the body of the template by calling run $root.SetAttribute(). This is handy if you need to alter the value independently of instantiation.
Next, add the following code to the stylesheet:
style <QuestLogItem> {
    PreferredSize = 1bw 1bh;
    BackgroundImage = "GeneralModule::quest_item_frame";
    LayoutType = Stack;
}

style quest-log-item-container {
    LayoutType = Horizontal;
    SpaceBetweenHorizontal = 1s;
    PreferredSize = 1s;
    Padding = 1s 20px;

    [when:parent attr:selected] {
        BackgroundImage = "GeneralModule::quest_item_frame_selected";
    }
}

style quest-log-shade {
    PreferredSize = 1bw 1bh;
    Visibility = Hidden;

    [hover:parent] {
        Visibility = Visible;
    }
    BackgroundImage = "GeneralModule::quest_item_frame_shade";

    [when:parent attr:selected] {
        BackgroundImage = "GeneralModule::quest_item_frame_selected_shade";
    }
}

style <QuestLogBracket> {
    PreferredSize = 1bw 1bh;
    LayoutBehavior = Ignored;
    AlignmentTarget = Parent;

    [when:parent attr:selected] {
        BackgroundImage = "GeneralModule::quest_item_frame_selected_corner";
        AlignmentOffset = -8px;

        [when:last-with-tag(QuestLogBracket)] {
            BackgroundImageRotation = 180deg;
            AlignmentDirection = End;
        }
    }
}
Most of the style logic is driven by a combination of style queries. For example, [when:parent attr:selected] ensures that the style is only run if the parent container has the attribute of selected. It is also possible to have nested queries. For example, <QuestLogBracket> has a [when:parent attr:selected] and inside of that style, is another query - [when:last-with-tag(QuestLogBracket)]. The nesting will ensure that when:last-with-tag styling will be applied if the parent is selected (per the first query) and is the last QuestLogBracket container (per the second query).
The value of the selected attribute is driven by the SelectionManager helper code that was included in the project.
Refresh the UI in Unity and you should now have a working quest list.